Knitting the butterfly idea came when I took loads of pictures of Butterflies when I visited Reiman Gardens recently.I started searching for patterns and landed here. The pattern was a butterfly puppet pattern. But tried to do something little different from the actual pattern.
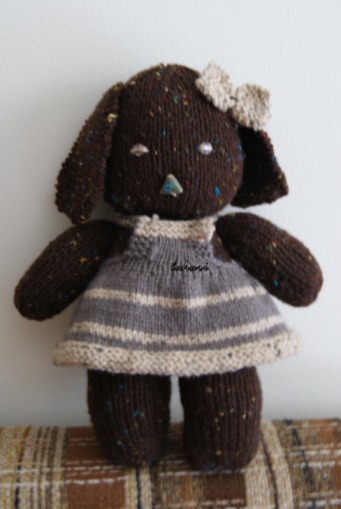
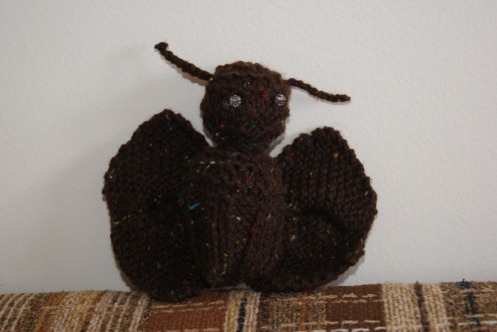
Firstly, I choose a bigger needle (9mm) and started following the pattern as in the original. Finally for the wings, I choose the lower wing pattern along and used a 4mm needle. The final look of the butterfly was something like this,below.
Firstly, I choose a bigger needle (9mm) and started following the pattern as in the original. Finally for the wings, I choose the lower wing pattern along and used a 4mm needle. The final look of the butterfly was something like this,below.

For the original pattern,please click here.
But for the butterfly above, the pattern goes something like this.
BODY:
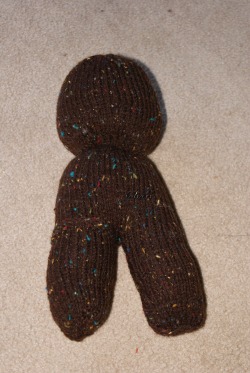
Row 1: Cast on 6 sts in the body color , join and knit 1 row (This is the tip of the head)
Row 2: kfb across - 12 sts
Row 3: Knit
Row 4: Kfb across- 24sts
Row 5-8: Knit
Row 9: *K2, K2tog* the entire row - 18 sts
Row 10 : Knit
Row 11: K2 tog - 9sts
Row 12 : Knit (This is neck portion **)
Row 13 : Kfb across - 18sts
Row 14: Knit
Row 15: * K2, Kfb* across - 24sts
Row 16-19 : Knit
Row 20-30: K2,P2 the entire row
Cut the thread at the end of Row 30. Using a needle pull the loose end of the thread and weave the thread to body.
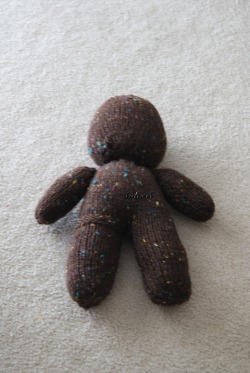
Shape of the neck:
Stuff the head with poly-fill stuffing.
Cut a piece of face color yarn lengthy enough. Starting at back weave in and out through sts of the neck portion **. Pull up tightly to shape neck. Wrap one end of yarn around neck to cover gathers and again, pull tight. Tie in secure knot and bury ends in body.
Stuff the rest of the body with poly-fill stuffing and weave the loose ends of the butterfly.
WINGS: (Make 2)
1: Cast on 8 sts. Join in the round and K 1 round even.
Row 3: Kfb, K2, Kfb, Kfb, K2, Kfb (12 sts)
Row 4: Knit
Row 5: Kfb, K4, Kfb, Kfb, K4, Kfb (16 sts)
Row 6: Knit
Row 7: Kfb, K4, Kfb, Kfb, K4, Kfb (16 sts)
Row 8: Knit
Round 9 : Kfb, K6, Kfb, Kfb, K6, Kfb (20sts)
Row 10: Knit
Row 11: Kfb, K8,Kfb, Kfb, K8, Kfb (24 sts)
Row 12: Knit
Row 13 : Kfb, K10, Kfb, Kfb, K10, Kfb (28sts)
Row 14 : Knit
Roq 15 : Kfb, K12, Kfb, K12, Kfb (32 sts)
Row 16-18 : Knit
Row 19 : SSK, K12, K2 tog, SSK, K12, K2 tog
Row 20: Knit
Row 21: SSK, K10, K2 tog, SSK, K10, K2 tog
Row 22 : Knit
Row 23 : SSK, K8, K2 tog, SSK, K8, K2 tog
Row 24 : Knit
Row 25 : SSK, K6, K2 tog, SSK, K6, K2 tog
Row 26 : Knit
Row 27 : SSK, K4, K2 tog, SSK, K4, K2 tog
Row 28 : Knit
Row 29: SSK, K2, K2 tog, SSK, K2, K2 tog
Row 30 : Knit
Bind off.
Attach the wings to the butterfly body..
But for the butterfly above, the pattern goes something like this.
BODY:
Row 1: Cast on 6 sts in the body color , join and knit 1 row (This is the tip of the head)
Row 2: kfb across - 12 sts
Row 3: Knit
Row 4: Kfb across- 24sts
Row 5-8: Knit
Row 9: *K2, K2tog* the entire row - 18 sts
Row 10 : Knit
Row 11: K2 tog - 9sts
Row 12 : Knit (This is neck portion **)
Row 13 : Kfb across - 18sts
Row 14: Knit
Row 15: * K2, Kfb* across - 24sts
Row 16-19 : Knit
Row 20-30: K2,P2 the entire row
Cut the thread at the end of Row 30. Using a needle pull the loose end of the thread and weave the thread to body.
Shape of the neck:
Stuff the head with poly-fill stuffing.
Cut a piece of face color yarn lengthy enough. Starting at back weave in and out through sts of the neck portion **. Pull up tightly to shape neck. Wrap one end of yarn around neck to cover gathers and again, pull tight. Tie in secure knot and bury ends in body.
Stuff the rest of the body with poly-fill stuffing and weave the loose ends of the butterfly.
WINGS: (Make 2)
1: Cast on 8 sts. Join in the round and K 1 round even.
Row 3: Kfb, K2, Kfb, Kfb, K2, Kfb (12 sts)
Row 4: Knit
Row 5: Kfb, K4, Kfb, Kfb, K4, Kfb (16 sts)
Row 6: Knit
Row 7: Kfb, K4, Kfb, Kfb, K4, Kfb (16 sts)
Row 8: Knit
Round 9 : Kfb, K6, Kfb, Kfb, K6, Kfb (20sts)
Row 10: Knit
Row 11: Kfb, K8,Kfb, Kfb, K8, Kfb (24 sts)
Row 12: Knit
Row 13 : Kfb, K10, Kfb, Kfb, K10, Kfb (28sts)
Row 14 : Knit
Roq 15 : Kfb, K12, Kfb, K12, Kfb (32 sts)
Row 16-18 : Knit
Row 19 : SSK, K12, K2 tog, SSK, K12, K2 tog
Row 20: Knit
Row 21: SSK, K10, K2 tog, SSK, K10, K2 tog
Row 22 : Knit
Row 23 : SSK, K8, K2 tog, SSK, K8, K2 tog
Row 24 : Knit
Row 25 : SSK, K6, K2 tog, SSK, K6, K2 tog
Row 26 : Knit
Row 27 : SSK, K4, K2 tog, SSK, K4, K2 tog
Row 28 : Knit
Row 29: SSK, K2, K2 tog, SSK, K2, K2 tog
Row 30 : Knit
Bind off.
Attach the wings to the butterfly body..